Recent Posts
Mold in New Construction: Prevention and Early Intervention
7/17/2024 (Permalink)
As a homeowner or property manager, one of the last things you want to discover in your new construction is mold. Mold not only damages your property but can lead to costly repairs if left unchecked. That's why it's crucial to understand how mold can occur in new constructions and what steps you can take to prevent it.
Understanding the Causes
Mold thrives in moist and humid environments, making new constructions particularly susceptible during and after the building process. Moisture can be introduced during construction due to rain, high humidity levels, or improper ventilation. Additionally, building materials such as wood, drywall, and insulation provide organic matter for mold to grow on if they become damp.
Prevention Strategies
- Proper Ventilation: Ensure that your construction site has adequate ventilation to allow moisture to escape. This includes using fans and dehumidifiers as needed, especially in areas prone to high humidity levels.
- Waterproofing: Take proactive measures to waterproof your construction, especially in areas susceptible to water intrusion such as basements, crawl spaces, and bathrooms. Use waterproofing materials and sealants to prevent moisture from seeping in.
- Prompt Repairs: Address any leaks or water damage immediately. Even minor leaks can lead to mold growth if left unattended. Inspect plumbing, roofing, and windows regularly for signs of leaks and repair them promptly.
- Proper Drainage: Ensure that the grading around your construction site slopes away from the foundation to prevent water from pooling around the building. Install gutters and downspouts to direct rainwater away from the structure.
- Mold-Resistant Materials: Consider using mold-resistant building materials where appropriate, such as mold-resistant drywall and paint. These materials are designed to inhibit mold growth, providing an added layer of protection.
Early Intervention
Despite taking preventive measures, mold can still occur in new constructions. Early intervention is key to minimizing damage and preventing mold from spreading. Keep an eye out for signs of mold, such as musty odors, discolored walls or ceilings, and visible mold growth.
If you suspect mold in your new construction, don't hesitate to take action. Contact a professional mold remediation company like SERVPRO® to assess the situation and develop a customized plan for mold removal and remediation.
Mold in new construction can be a serious issue if not addressed promptly. By understanding the causes and implementing preventive measures, you can minimize the risk of mold growth in your property. And if mold does occur, early intervention is crucial to prevent further damage. Remember, SERVPRO is here to help with all your mold remediation needs. Don't let mold spoil your new construction—take proactive steps to protect your investment today!
Sustainable Restoration: Materials for Water Damage Restoration
6/13/2024 (Permalink)
 If you're in need of water damage restoration services, don't hesitate and give our SERVPRO of Southwest Raleigh/Holly Springs team a call today!
In the aftermath of water damage, rebuilding your home is an opportunity to not only restore but also improve its resilience and sustainability. Choosing the right materials for reconstruction can make a significant difference in the long-term durability and environmental impact of your home. In this blog post, we'll explore the importance of selecting sustainable materials for water damage restoration and provide guidance on choosing eco-friendly options that promote both environmental and personal well-being.
Why Choose Sustainable Materials?
When rebuilding after water damage, it's crucial to consider the environmental impact of the materials used. By opting for sustainable materials, homeowners can reduce their carbon footprint, conserve natural resources, and create healthier indoor environments for themselves and their families.
Key Considerations for Choosing Sustainable Materials
Recycled Content
Look for building materials that contain recycled content, such as recycled wood, metal, or plastic. Using recycled materials reduces the demand for virgin resources and diverts waste from landfills. Additionally, recycled content materials often require less energy to manufacture, further reducing their environmental footprint.
Renewable Resources
Choose materials made from renewable resources that can be replenished naturally, such as bamboo, cork, or sustainably harvested wood. These materials have a lower environmental impact compared to non-renewable alternatives and promote the responsible management of forests and ecosystems.
Low VOCs
Volatile organic compounds (VOCs) are chemicals found in many building materials that can off-gas and contribute to indoor air pollution. Opt for materials with low or zero VOC emissions to create a healthier indoor environment for your family. Look for certifications such as GREENGUARD or Cradle to Cradle to ensure that the materials meet strict indoor air quality standards.
Energy Efficiency
Choose energy-efficient materials that help reduce heating and cooling costs and minimize your home's overall energy consumption. Consider installing energy-efficient windows, doors, and insulation to improve thermal performance and reduce energy waste. Additionally, incorporating renewable energy systems such as solar panels can further enhance your home's sustainability and resilience.
Durability and Longevity
Select materials that are durable, long-lasting, and require minimal maintenance to reduce the need for frequent replacements and repairs. Investing in high-quality, resilient materials upfront can save you money in the long run and reduce the environmental impact associated with frequent renovations and replacements.
Examples of Sustainable Materials for Water Damage Restoration
- Recycled-content insulation made from recycled denim or fiberglass
- Bamboo or cork flooring sourced from renewable forests
- Low-VOC paint and finishes for interior walls and ceilings
- Energy-efficient windows and doors with double or triple-glazing
- Sustainable roofing materials such as metal, clay, or recycled rubber
By choosing sustainable materials for water damage restoration, homeowners can contribute to a more environmentally friendly and resilient built environment while creating healthier and more sustainable homes for themselves and future generations. If you're in need of water damage restoration services, don't hesitate and give our SERVPRO of Southwest Raleigh/Holly Springs team a call today!
A Guide to Understanding Wind Damage
5/15/2024 (Permalink)
 Stay informed, stay vigilant, stay safe, and call our team for assistance with property damage.
When it comes to natural disasters, wind can be a powerful and destructive force. Understanding the potential effects of wind damage is crucial for homeowners and business owners alike. In this guide, we'll explore the various ways wind damage can impact properties and offer tips on how to prepare for and mitigate its effects.
1. Roof Damage
One of the most common consequences of high winds is roof damage. Strong gusts can lift shingles, tear off roofing materials, and even cause structural damage to the roof deck. Inspect your roof regularly for signs of wear and tear, and reinforce vulnerable areas to minimize the risk of damage during storms.
2. Siding and Exterior Damage
Wind can also wreak havoc on the exterior of buildings, causing siding to become loose, crack, or detach completely. Flying debris propelled by high winds can cause dents, punctures, and other forms of damage to siding materials. Ensure that your siding is securely installed and consider reinforcing it with impact-resistant materials.
3. Windows and Doors
Windows and doors are particularly vulnerable to wind damage, especially during severe storms and hurricanes. High winds can cause windows to shatter, frames to warp, and doors to become misaligned or damaged. Invest in storm shutters or impact-resistant glass to protect your windows and doors from wind-driven debris.
4. Falling Trees and Branches
Strong winds can uproot trees, snap branches, and topple power lines, posing a significant risk to nearby structures. Trim trees and branches regularly to prevent them from falling onto your property during storms. Remove dead or diseased trees that may be more susceptible to wind damage.
5. Structural Integrity
In extreme cases, prolonged exposure to high winds can compromise the structural integrity of buildings, leading to collapse or partial failure. Ensure that your property is built to code and undergoes regular inspections to identify and address any structural vulnerabilities.
6. Water Intrusion
Wind-driven rain can infiltrate buildings through gaps, cracks, and compromised roofing materials, leading to water damage and mold growth. Seal gaps and cracks around windows, doors, and other openings to prevent water intrusion during storms. Maintain your gutters and downspouts to ensure proper drainage away from the building.
7. Mitigation and Preparedness
To minimize the risk of wind damage, it's essential to take proactive measures to prepare your property. Secure outdoor furniture and equipment, reinforce vulnerable areas, and consider installing wind-resistant features such as impact-resistant windows and doors. Develop a comprehensive emergency plan and stay informed about weather forecasts and warnings.
Understanding the potential impact of wind damage is key to protecting your property and ensuring the safety of your family or occupants. By taking proactive measures to reinforce vulnerable areas, mitigate risks, and prepare for emergencies, you can minimize the effects of wind damage and enhance the resilience of your property against future storms. Stay informed, stay vigilant, and stay safe.
Why Removing Insulation After a Fire Is a Good Idea
4/9/2024 (Permalink)
After a fire, the road to restoring your home to its pre-fire condition can be daunting. Among the many tasks involved in the restoration process, one crucial step often overlooked is the removal of insulation. While it may seem like a minor detail, there are several compelling reasons why removing insulation after a fire is essential for achieving comprehensive restoration results. Let's explore in more detail why insulation removal should be a priority after a fire.
1. Smoke and Soot Contamination
Insulation serves as a magnet for smoke and soot particles during a fire. Even if the insulation appears intact on the surface, these contaminants can penetrate deep into its fibers, compromising indoor air quality and posing risks to occupants. The longer contaminated insulation remains in place, the greater the risk of continued exposure to harmful pollutants. By promptly removing contaminated insulation, restoration professionals can eliminate these pollutants and create a safer and healthier living environment for you and your family.
2. Water Damage Mitigation
In addition to smoke and soot contamination, insulation may also be affected by water damage from firefighting efforts. Wet insulation not only loses its effectiveness in regulating temperature but also becomes a breeding ground for mold and mildew. Left unchecked, mold growth can spread rapidly throughout your home, leading to further damage and indoor air quality issues. By removing water-damaged insulation promptly, restoration professionals can mitigate the risk of mold growth and prevent secondary damage to your home's structure.
3. Structural Integrity and Odor Elimination
Fire-damaged insulation can compromise the structural integrity of your home by retaining moisture, harboring mold, and emitting foul odors. Even after the visible signs of fire damage have been addressed, lingering odors can persist if contaminated insulation remains in place. Removing fire-damaged insulation is crucial for restoring your home's structural integrity and eliminating stubborn odors, ensuring that your living space is safe, comfortable, and odor-free.
4. Preventing Future Problems
By removing insulation that has been compromised by smoke, soot, or water damage, you are taking proactive steps to prevent future problems down the line. Mold growth, poor indoor air quality, and structural issues can all arise if contaminated insulation is left in place. By addressing these issues early on through insulation removal, you can mitigate the risk of more extensive damage and costly repairs in the future.
In conclusion, while it may seem like an extra step in the restoration process, replacing the insulation after a fire is essential for achieving thorough and effective restoration results. By eliminating smoke and soot contamination, preventing mold growth, and restoring your home's structural integrity, insulation removal sets the foundation for a successful restoration project. If you've experienced a fire in your home, don't overlook the importance of insulation removal – trust the experts at SERVPRO® to handle the job safely, efficiently, and effectively.
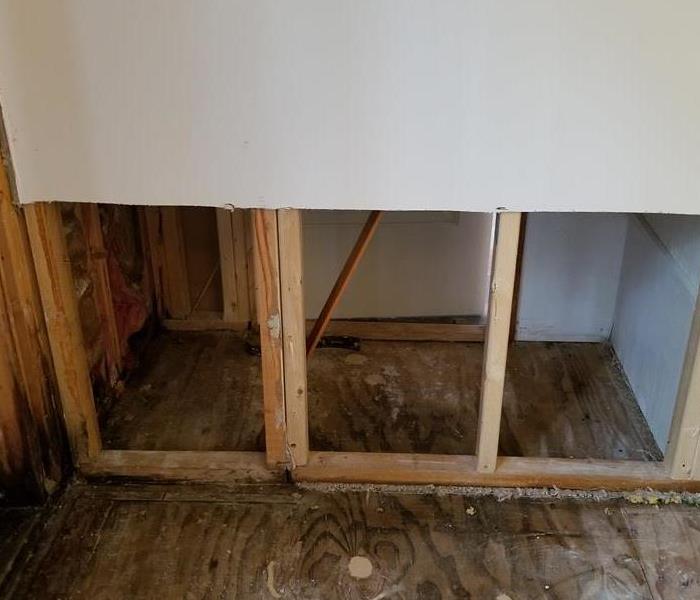
Mold in New Construction: Prevention and Early Intervention
3/13/2024 (Permalink)
 New construction sites may seem immune to mold, but they can be susceptible to mold growth if proper precautions are not taken.
New construction sites may seem immune to mold, but they can be susceptible to mold growth if proper precautions are not taken. Mold can cause structural damage and lead to expensive remediation efforts if left unchecked. In this blog, we will explore how mold can show up on new construction sites, the signs to look for, early intervention steps to remediate mold, and methods to prevent further mold development on the site.
How Mold Shows Up on New Construction Sites
Mold can find its way onto new construction sites due to a variety of factors, such as improper drying of building materials, excessive moisture, or water leaks during construction. Here are some common areas where mold may appear:
- Building Materials: If construction materials are exposed to wet or humid conditions for an extended period, mold can develop on surfaces like wood, drywall, or insulation.
- Basements or Foundations: Areas below ground level, such as basements or foundations, are more likely to have higher moisture levels. If proper waterproofing measures are not implemented, mold can grow on the concrete or other building materials.
- Plumbing and HVAC Systems: Leaks or condensation from plumbing or HVAC systems can create a conducive environment for mold growth behind walls, ceilings, or in crawl spaces.
Early Intervention to Remediate Mold
If mold is detected on a new construction site, prompt action is crucial to prevent further damage. Here are the steps for early intervention and remediation:
- Assess the Scope: Determine the extent of the mold growth and identify the affected areas. This assessment will guide the remediation process.
- Isolate the Affected Area: To prevent the spread of mold spores, isolate the affected area by sealing it off with plastic sheeting. This containment minimizes the risk of cross-contamination.
- Remove Mold-Infested Materials: Any mold-infested materials, such as drywall or insulation, should be carefully removed and disposed of in a manner that avoids spreading mold spores.
- Thoroughly Clean the Area: Clean all surfaces using appropriate mold-remediating products. This step helps eliminate any remaining mold spores and ensures the area is properly sanitized.
- Dry and Dehumidify: Implement proper drying techniques to eliminate excess moisture from the area. Utilize dehumidifiers and fans to aid in drying building materials.
- Monitor and Inspect: Continuously monitor the construction site for any signs of recurring mold growth. Regular inspections will help detect and address any potential issues before they escalate.
Preventing Further Mold Development on the Site
To prevent future mold growth on a new construction site, it is essential to implement preventive measures. Here are some key steps to consider:
- Proper Moisture Control: Ensure that the construction site is properly protected from rain, and implement moisture control measures like covering materials and using dehumidifiers.
- Effective Ventilation: Adequate ventilation throughout the construction site helps reduce moisture buildup. Install and maintain fans or ventilation systems to promote air circulation.
- Regular Inspections: Conduct regular inspections to identify any signs of moisture intrusion, leaks, or water damage. Address these issues promptly to prevent mold growth.
- Thorough Quality Control: Implement strict quality control measures throughout the construction process. This includes inspecting materials for signs of moisture damage before installation and addressing any issues immediately.
- Professional Mold Remediation: If mold reappears or becomes a recurring issue, consult a professional mold remediation company like SERVPRO® for thorough assessment and remediation. Their experts can provide recommendations to prevent further mold damage.
By taking proactive steps and addressing mold issues promptly, you can prevent further mold development and ensure the success of your new construction project.
Mold on your Construction Site
Mold growth on new construction sites can lead to structural damage and compromise the success of the project. Preventing mold from developing and taking early intervention steps are essential to avoid further damage. Regular inspections, prompt remediation, effective moisture control, and professional assistance when needed will help prevent future mold damage on new construction sites. Invest in mold prevention strategies to ensure the long-term success of your construction project.
9 Tips for Restoring Furniture After Water Damage
2/21/2024 (Permalink)
 Restoring water-damaged furniture demands prompt action and careful execution.
Water damage wreaks havoc on furniture, causing stains, warping, and deterioration. Salvaging water-damaged furniture requires immediate action and the right approach. Here are some practical steps and insights to help you salvage your furniture after a water loss:
1. Act Swiftly
Time is of the essence when dealing with water-damaged furniture. Begin the restoration process as soon as possible to prevent further deterioration. The longer furniture remains wet, the higher the chances of irreparable damage and mold growth.
2. Assess the Damage
Before initiating any restoration, carefully assess the extent of the damage. Check for water stains, warping, mold growth, and structural integrity issues. This evaluation helps determine the appropriate restoration methods for each piece of furniture.
3. Remove Excess Moisture
Start by blotting excess water using clean, dry towels or cloths. Avoid rubbing the affected areas, as it may worsen the damage. For wooden furniture, use a soft cloth to gently absorb moisture without applying excessive pressure.
4. Dry Thoroughly
Proper drying is crucial to prevent further damage and mold growth. Place water-damaged furniture in a well-ventilated area with adequate airflow. Utilize fans or dehumidifiers to expedite the drying process. For upholstered pieces, remove cushions and thoroughly dry them separately.
5. Clean and Sanitize
After drying, clean the furniture surfaces using a mild detergent or cleaning solution. This step helps remove dirt, grime, and any remaining traces of moisture. For wooden furniture, use a wood cleaner to restore its shine and luster.
6. Prevent Mold
Mold growth is a common concern after water damage. To prevent mold, use a mixture of water and vinegar or a commercial disinfectant to sanitize furniture surfaces thoroughly. Ensure proper ventilation during and after the cleaning process.
7. Address Wood Furniture
For wooden furniture, addressing warping or swelling is crucial. Gently reshape warped wood by applying pressure evenly across the surface. Avoid exposing wood to direct sunlight or heat, as it may cause further damage.
8. Consider Professional Assistance
Some severe water damage cases may require professional restoration services. If you're unsure about the best approach or if the damage is extensive, seek assistance from restoration experts, like SERVPRO of Southwest Raleigh/Holly Springs.
9. Monitor and Maintain
After restoration, keep a close eye on the furniture to ensure it's completely dry and free of mold. Regular maintenance, such as dusting and occasional cleaning, helps prevent future damage.
In conclusion, restoring water-damaged furniture demands prompt action and careful execution. By following these expert tips and taking proactive measures, you increase the likelihood of salvaging your furniture and minimizing the impact of water damage. Remember, patience and proper techniques are essential in the restoration process to preserve the integrity and beauty of your furniture.
Steps for Home and Business Owners to Mitigate Hail Damage
1/17/2024 (Permalink)
Hailstorms can cause significant damage to homes and businesses, resulting in costly repairs and disruptions. Taking proactive measures to mitigate hail damage can help minimize the impact and protect your property. In this blog, we'll discuss crucial steps that home and business owners can take to minimize the effects of hailstorms.
Understanding Hail Damage
Hailstones can vary in size and cause damage to roofs, windows, siding, vehicles, and outdoor equipment. Larger hailstones can cause severe damage, leading to leaks and structural issues. Older roofs, fragile materials, and inadequate maintenance can increase vulnerability to hail damage.
Steps to Mitigate Hail Damage
Regular Inspections
Conduct regular inspections of your property, focusing on the roof, siding, windows, and outdoor structures. Look for signs of damage or vulnerabilities that could worsen during a hailstorm.
Roof Maintenance
Keep your roof in good condition by repairing or replacing damaged shingles, flashing, or gutters. Consider impact-resistant roofing materials if you live in an area prone to hailstorms.
Protective Measures
Install protective coverings like storm shutters for windows or invest in impact-resistant windows and doors to reduce the risk of damage.
Secure Outdoor Items
During severe weather alerts, secure outdoor furniture, equipment, and vehicles in a covered area or garage to minimize damage caused by hailstones.
Landscaping Considerations
Trim trees and remove dead branches that could potentially break and cause damage during hailstorms. Protect delicate plants by covering them with a tarp or bringing them indoors.
Insurance Review
Review your insurance policy to ensure adequate coverage for hail damage. Understand what is covered and document your property for insurance claims.
Professional Assessment
After a hailstorm, seek professional assessment and inspection of your property by experienced restoration and roofing professionals like our SERVPRO® team to identify and address any damage.
Mitigating hail damage involves proactive maintenance, protective measures, and timely inspections. By taking these essential steps, home and business owners can significantly reduce the impact of hailstorms on their properties. Prepare now to mitigate hail damage and protect your property from the effects of severe weather!
Surviving the Dark: A Guide to Coping with Power Outages After a Storm
9/25/2023 (Permalink)
Power outages during storms can be a common occurrence, especially in the Southeast region. While it may be inconvenient and disruptive, it's important to prioritize safety during these times. Being prepared and taking appropriate measures can help you cope with power outages and ensure the well-being of yourself and your loved ones. In this blog post, we will discuss safety measures to implement during power outages caused by Southeast storms.
Have a Well-Equipped Emergency Kit
Preparing an emergency kit in advance is essential for coping with power outages. The kit should include essential items such as flashlight(s) with extra batteries, a battery-operated radio, a first aid kit, a supply of non-perishable food and water, a manual can opener, and any necessary medications. Also, have blankets, warm clothing, and extra layers to stay comfortable in case the power outage lasts for an extended period or occurs during cold weather.
During a power outage, stay informed about the situation by listening to battery-operated radios or utilizing a mobile device with cellular data. Keep a list of emergency contact numbers readily available. Plan a communication strategy with your family or housemates to ensure everyone knows how to stay in touch and where to meet if separated during the outage.
Preserve Food Safety and electronics
When the power goes out, it's important to take measures to preserve the safety of perishable food items in your refrigerator and freezer. Keep the refrigerator and freezer doors closed as much as possible to maintain the cold air inside. As a general rule, food in a closed refrigerator will stay cold for about four hours, while a full freezer can remain cold for up to 48 hours. If necessary, consider using coolers with ice or storing food in a neighbor's refrigerator during an extended outage.
Using candles during a power outage may seem like a convenient option, but it can be a fire hazard. Instead, opt for battery-powered flashlights or lanterns to provide light safely. Keep a supply of extra batteries on hand and avoid using open flame sources indoors.
To protect your electronics and appliances from power surges when the power is restored, unplug them during the outage. This can help prevent potential damage to your devices and avoid electrical fires caused by power fluctuations.
Avoid Carbon Monoxide Poisoning
If using a generator during a power outage, ensure it is set up and operated correctly to prevent carbon monoxide poisoning. Generators should be placed outdoors in a well-ventilated area, away from windows, doors, and vents. Carbon monoxide is an odorless and colorless gas that can be deadly when inhaled. Never use a portable generator or any fuel-burning equipment indoors or in enclosed spaces.
Stay Warm During Cold Weather
Power outages during Southeast storms can sometimes occur during colder months. If you experience an outage during cold weather, take steps to stay warm. Bundle up in layered clothing, use blankets, and gather in one central area to share body heat. Consider using alternative heat sources such as a fireplace or properly vented propane heater. Ensure proper ventilation to prevent carbon monoxide buildup.
During a power outage, remember to check on elderly neighbors, individuals with disabilities, or anyone who may be more vulnerable. They may require additional assistance or support during this time. Offer to help them with essential tasks and ensure they have the necessary resources and supplies.
Power outages during Southeast storms can be frustrating, but prioritizing safety measures is crucial. By being prepared and taking appropriate measures, you can navigate power outages with confidence and protect the well-being of yourself and your loved ones.
Grill Safely: Top Tips to Avoid Fires When Grilling
8/3/2023 (Permalink)
Grilling is an enjoyable outdoor activity that brings family and friends together to share sizzling hot meals. While it's a fun pastime, it can pose significant fire hazards if not done safely. Grilling fires can start and spread quickly due to factors such as grease buildup, overheating, and improper storage. In this blog post, we will discuss safety measures that can help you avoid fires when grilling.
Location
Choose an appropriate location for your grill that is away from combustible materials like dry leaves, branches, and structures. Choose a flat, stable surface that can withstand the weight of the grill and will not tip over easily.
Clean your grill before and after each use to remove leftover grease and food particles that can start fires. If left uncleaned, grease can accumulate and reach high temperatures during cooking, causing flare-ups and fires.
Proper storage
Store your propane tanks away from direct sunlight, heat sources, and high traffic areas. Keep them in an upright position, secured tightly, and away from flammable materials.
Use a long spatula and tongs to turn the food instead of piercing it with a fork. Perforating the meat can cause the juices to leak onto the hot coals, resulting in flare-ups and potential fires.
Never leave the grill unattended. Grilling requires constant attention, so never leave the grill unattended. Stay close to the grill and keep children and pets away from the grill area.
Be prepared
Always have a fire extinguisher, baking soda, or a bucket of sand nearby in case of a fire. Never use water to put out a grill fire that started due to grease buildup as it can cause the flames to spread. Before turning on the gas grill, check the hoses regularly for leaks and any worn or damaged areas that can lead to leaks. If you smell gas or suspect a leak, turn off the gas immediately, and contact a professional for a repair or replacement. Preheat the grill before cooking, and avoid exposing the food to high heat initially. The flames can char the food or ignite flare-ups. Cook the food slowly and naturally to avoid fires.
In conclusion, grilling is a great outdoor activity that brings family and friends together. However, it's critical to follow safety measures to avoid fires. Choosing an appropriate location, cleaning the grill regularly, proper storage, appropriate tools, not leaving the grill unattended, being prepared, checking for leaks and wear, and cooking slowly and steadily are some of the safety measures you can take. By practicing safe grilling, you can ensure that you have a safe and enjoyable time with your delicious grilled meals without any mishaps.
Is Your Refrigerator Leaking? Signs to Watch Out For
7/24/2023 (Permalink)
 Addressing a leaking refrigerator quick can help prevent kitchen water damage.
Refrigerators play a crucial role in keeping our food fresh and preserving perishable items. However, a leaking refrigerator can be a cause for concern. Not only can it damage your kitchen floor or surrounding areas, but it may also indicate an underlying issue that needs attention. In this blog, we will discuss common signs that indicate your refrigerator is leaking and what steps you can take to address the problem.
Puddles or Water Stains
The most apparent sign of a leaking refrigerator is the presence of water puddles or stains on the floor near the appliance. If you notice water accumulating around the base of the refrigerator or spreading to adjacent areas, it's a clear indication that something is amiss.
Wet or Damp Interior
A leaking refrigerator may result in moisture buildup inside the unit. Check the walls, shelves, and drawers for any signs of wetness or excessive condensation. Damp or wet food items can also be an indicator of a leak.
Ice buildup inside the freezer beyond normal levels can be a sign of a leaking refrigerator. When the water from the defrost cycle doesn't drain properly, it can freeze and accumulate, leading to excessive ice formation.
Moldy or Unpleasant Odors
Moisture from a leaking refrigerator can create a conducive environment for mold and mildew growth. If you notice a musty or unpleasant odor coming from your refrigerator, it could be an indication of a hidden leak and subsequent mold development.
Unusual Sounds
While not directly related to leaks, unusual sounds like dripping, hissing, or gurgling coming from your refrigerator can be associated with a malfunctioning water line or a leak in the system. Pay attention to any unusual noises and investigate further if necessary.
Decreased Cooling Performance
A leaking refrigerator may affect its cooling efficiency. If you observe that the temperature inside the fridge or freezer is not as cold as it should be, it could be a result of a leak impacting the overall functionality of the appliance.
If your refrigerator has a water dispenser, a leak in the water line can cause problems. Check for water dripping from the dispenser or difficulty in obtaining water, as these issues may be linked to a leaking refrigerator.
Inspect the Water Supply Line
Check the water supply line at the back of the refrigerator for any cracks, loose connections, or signs of damage. Tighten or replace the line as necessary.
Clear Blocked Drain Tube. A clogged or frozen drain tube can cause water to back up and leak inside the refrigerator. Clear any blockages using a pipe cleaner or warm water to restore proper drainage.
Check the Door Seal
Faulty door seals can allow warm air to enter the refrigerator, leading to excess condensation and potential leaks. Inspect the seals and replace them if they are damaged or worn out.
Clean and Defrost the Freezer. Excessive ice buildup in the freezer can be a result of a leaking refrigerator. Turn off the unit, remove any food items, and allow it to defrost. Clean the freezer and ensure proper drainage after defrosting.
Seek Professional Help
If you're unable to identify or fix the source of the leak, it's advisable to contact a professional appliance repair technician. They have the expertise to diagnose and resolve complex issues associated with leaking refrigerators.
Detecting and addressing a leaking refrigerator in its early stages is essential to prevent further damage to your appliance and surrounding areas. By recognizing the signs of a leak and taking appropriate action, such as inspecting water supply lines, clearing blockages, and seeking professional assistance if needed, you can maintain the functionality and longevity of your refrigerator while avoiding potential water damage headaches.

 24/7 Emergency Service